前言 上篇文章也说了,这两天我又把SpringSecurity看了一遍,记得之前看的时候就只看到加密然后被一个bug卡了一天就去看别的了,现在重新看顺便把之前没做完的笔记补一补,下面基本是根据三更草堂的笔记整理过来的
完整流程图
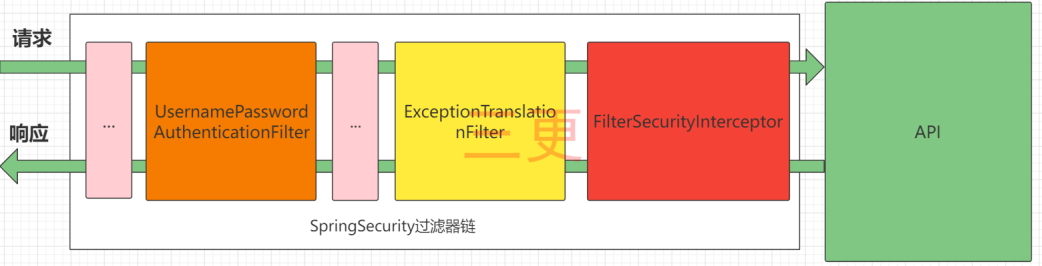
SpringSecurity的原理其实就是一个过滤器链,内部包含了提供各种功能的过滤器
UsernamePasswordAuthenticationFilter:负责处理我们在登陆页面填写了用户名密码后的登陆请求。入门案例的认证工作主要有它负责。
ExceptionTranslationFilter:处理过滤器链中抛出的任何AccessDeniedException和AuthenticationException 。
FilterSecurityInterceptor:负责权限校验的过滤器。
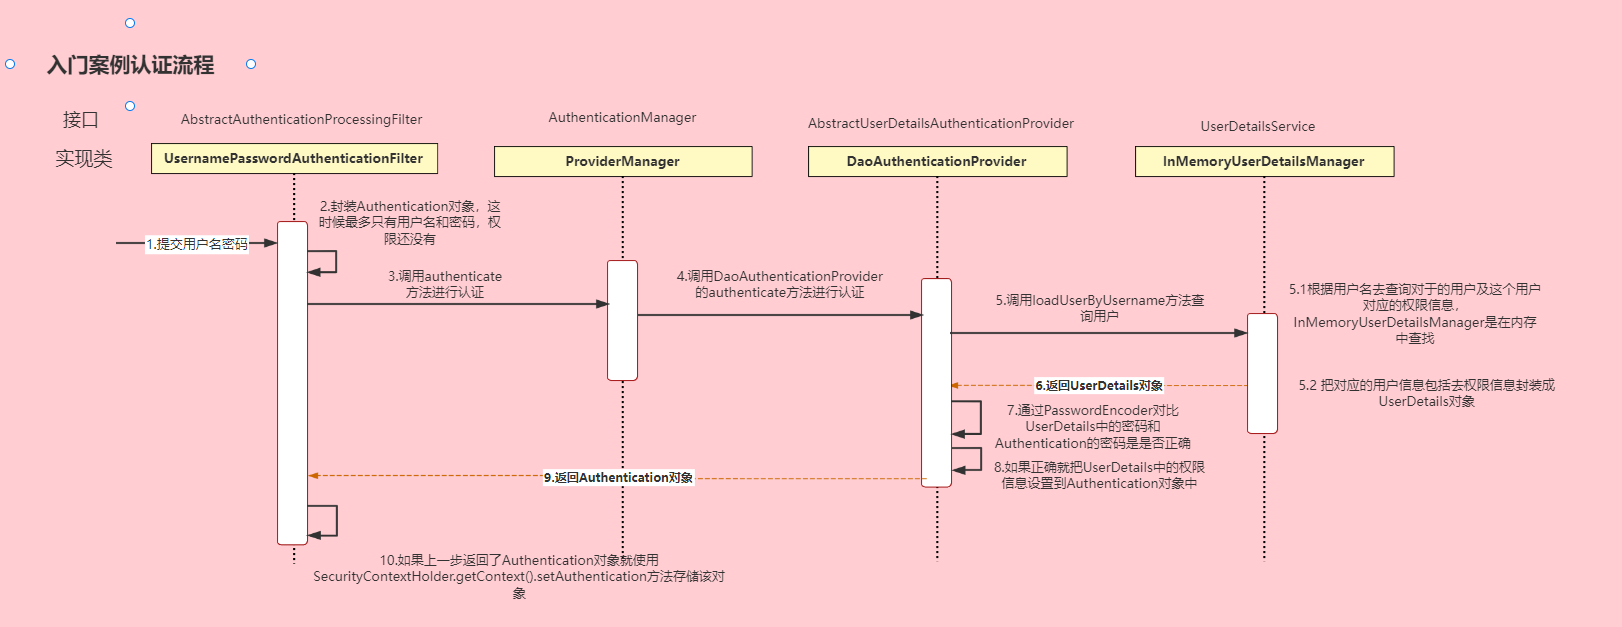
Authentication接口: 它的实现类,表示当前访问系统的用户,封装了用户相关信息。
AuthenticationManager接口:定义了认证Authentication的方法
UserDetailsService接口:加载用户特定数据的核心接口。里面定义了一个根据用户名查询用户信息的方法。
UserDetails接口:提供核心用户信息。通过UserDetailsService根据用户名获取处理的用户信息要封装成UserDetails对象返回。然后将这些信息封装到Authentication对象中。
SecurityConfig配置 1 2 3 4 5 6 7 8 9 10 11 12 13 14 15 16 17 18 19 20 21 22 23 24 25 26 27 28 29 30 31 32 33 34 35 36 37 38 39 40 41 42 43 44 45 @Configuration @EnableGlobalMethodSecurity(prePostEnabled = true) public class SecurityConfig extends WebSecurityConfigurerAdapter { @Bean public BCryptPasswordEncoder passwordEncoder () { return new BCryptPasswordEncoder (); } @Autowired JwtAuthenticationTokenFilter jwtAuthenticationTokenFilter; @Autowired AuthenticationEntryPointImpl authenticationEntryPoint; @Autowired AccessDeniedHandlerImpl accessDeniedHandler; @Override protected void configure (HttpSecurity http) throws Exception { http .csrf().disable() .sessionManagement().sessionCreationPolicy(SessionCreationPolicy.STATELESS) .and() .authorizeRequests() .antMatchers("/user/login" ).anonymous() .anyRequest().authenticated(); http.addFilterBefore(jwtAuthenticationTokenFilter, UsernamePasswordAuthenticationFilter.class); http.exceptionHandling() .authenticationEntryPoint(authenticationEntryPoint) .accessDeniedHandler(accessDeniedHandler); http.cors(); } @Bean @Override public AuthenticationManager authenticationManagerBean () throws Exception { return super .authenticationManagerBean(); } }
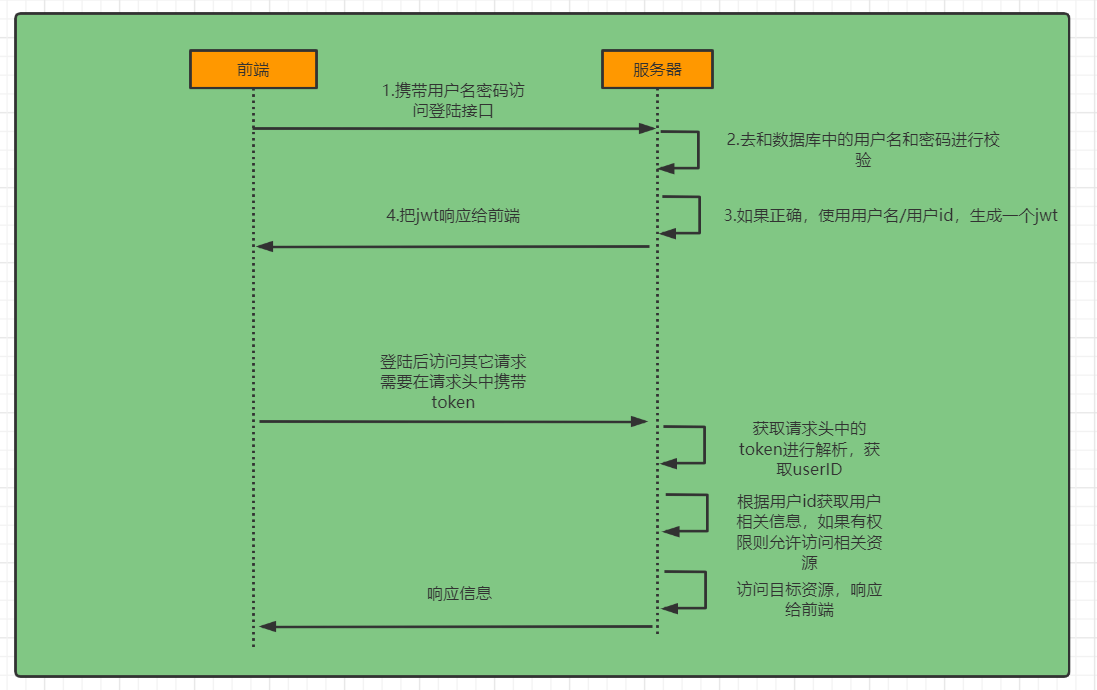
认证 自定义登录接口 认证成功的话要生成一个jwt,放入响应中返回。并且为了让用户下回请求时能通过jwt识别出具体的是哪个用户,我们需要把用户信息存入redis,可以把用户id作为key。
1
2
3
4
5
6
7
8
9
10
11
12
13
14
15
@RestController public class LoginController { @Autowired private LoginService loginService; @PostMapping("/user/login") public ResponseResult login (@RequestBody User user) { return loginService.login(user); } @RequestMapping("/user/logout") public ResponseResult logout () { return loginService.logout(); } }
1
2
3
4
5
6
7
8
9
10
11
12
13
14
15
16
17
18
19
20
21
22
23
24
25
26
27
28
29
30
31
32
33
34
35
36
@Service public class LoginServiceImpl implements LoginService { @Autowired AuthenticationManager authenticationManager; @Autowired RedisCache redisCache; @Override public ResponseResult login (User user) { UsernamePasswordAuthenticationToken authenticationToken = new UsernamePasswordAuthenticationToken (user.getUserName(), user.getPassword()); Authentication authenticate = authenticationManager.authenticate(authenticationToken); if (Objects.isNull(authenticate)) { throw new RuntimeException ("登录失败" ); } LoginUser loginUser = (LoginUser) authenticate.getPrincipal(); String userid = loginUser.getUser().getId().toString(); String jwt = JwtUtil.createJWT(userid); redisCache.setCacheObject("login:" + userid, loginUser); HashMap<String, String> map = new HashMap <>(); map.put("token" , jwt); return new ResponseResult (200 , "登录成功" , map); } @Override public ResponseResult logout () { Authentication authentication = SecurityContextHolder.getContext().getAuthentication(); LoginUser loginUser = (LoginUser) authentication.getPrincipal(); Long userid = loginUser.getUser().getId(); redisCache.deleteObject("login:" + userid); return new ResponseResult (200 ,"注销成功" ); } }
自定义认证过滤器 1 2 3 4 5 6 7 8 9 10 11 12 13 14 15 16 17 18 19 20 21 22 23 24 25 26 27 28 29 30 31 32 33 34 35 36 @Component public class JwtAuthenticationTokenFilter extends OncePerRequestFilter { @Autowired RedisCache redisCache; @Override protected void doFilterInternal (HttpServletRequest request, HttpServletResponse response, FilterChain filterChain) throws ServletException, IOException { String token = request.getHeader("token" ); if (!StringUtils.hasText(token)) { filterChain.doFilter(request, response); return ; } String userid; try { Claims claims = JwtUtil.parseJWT(token); userid = claims.getSubject(); } catch (Exception e) { e.printStackTrace(); throw new RuntimeException ("token非法" ); } String redisKey = "login:" + userid; LoginUser loginUser = redisCache.getCacheObject(redisKey); if (Objects.isNull(loginUser)) { throw new RuntimeException ("用户未登录" ); } UsernamePasswordAuthenticationToken authenticationToken = new UsernamePasswordAuthenticationToken (loginUser, null , loginUser.getAuthorities()); SecurityContextHolder.getContext().setAuthentication(authenticationToken); filterChain.doFilter(request, response); } }
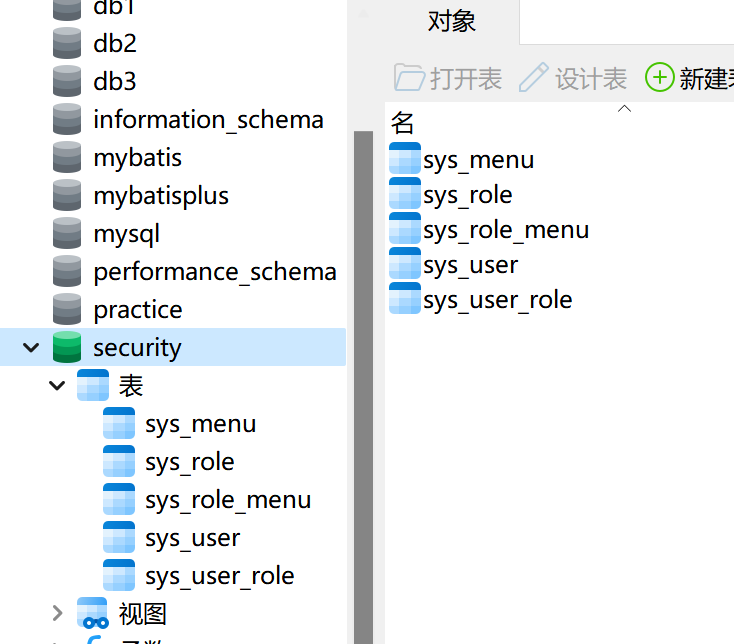
授权 需要的表如下
我觉得比较重要的字段是功能权限信息,表结构如下
限制访问资源所需权限 我们可以使用注解去指定访问对应的资源所需的权限(主要使用)
先开启权限配置
1
2
3
@Configuration @EnableGlobalMethodSecurity(prePostEnabled = true) public class SecurityConfig extends WebSecurityConfigurerAdapter {
然后就可以使用对应的注解。@PreAuthorize
1
2
3
4
5
6
7
8
@RestController public class HelloController { @GetMapping("/hello") @PreAuthorize("hasAuthority('system:dept:list')") public String hello () { return "hello" ; } }
封装权限信息 下面具体看一下UserDetails的实现类LoginUser的getAuthorities方法的实现,这里使用了Java8的新特性流,当然注释里的方法也是可行的
1
2
3
4
5
6
7
8
9
10
11
12
13
14
15
16
17
@JSONField(serialize = false) List<SimpleGrantedAuthority> authorities; @Override public Collection<? extends GrantedAuthority > getAuthorities() { if (authorities != null ){ return authorities; } authorities = permissions.stream() .map(SimpleGrantedAuthority::new ) .collect(Collectors.toList()); return authorities; }
查询权限 这里放一下我写的SQL,三更用的是显式,但我更喜欢隐式哈哈哈
1
2
3
4
5
6
select distinct m.perms from sys_role as r, sys_menu as m, sys_user_role as ur, sys_role_menu as rm where ur.role_id = rm.role_id and rm.menu_id = m.id and ur.user_id = #{userid}
然后我们可以在UserDetailsServiceImpl中去调用该mapper的方法查询权限信息封装到LoginUser对象中即可,代码在上面的UserDetailsServiceImpl已经放过了这里就不再放了
自定义失败处理 如果是认证过程中出现的异常会被封装成AuthenticationException然后调用AuthenticationEntryPoint对象的方法去进行异常处理。
如果是授权过程中出现的异常会被封装成AccessDeniedException然后调用AccessDeniedHandler对象的方法去进行异常处理。
所以如果我们需要自定义异常处理,我们只需要自定义AuthenticationEntryPoint和AccessDeniedHandler然后配置给SpringSecurity即可。
这里就放其中一个,另一个写法一致,还要记得在SecurityConfig中配置这两个实现类
1
2
3
4
5
6
7
8
9
@Component public class AccessDeniedHandlerImpl implements AccessDeniedHandler { @Override public void handle (HttpServletRequest request, HttpServletResponse response, AccessDeniedException accessDeniedException) throws IOException, ServletException { ResponseResult result = new ResponseResult (HttpStatus.FORBIDDEN.value(), "您的权限不足!" ); String json = JSON.toJSONString(result); WebUtils.renderString(response, json); } }
跨域 一是对SpringBoot配置,二是在SecurityConfig中配置(添加http.cors()即可)
1
2
3
4
5
6
7
8
9
10
11
12
13
14
15
16
17
18
@Configuration public class CorsConfig implements WebMvcConfigurer { @Override public void addCorsMappings (CorsRegistry registry) { registry.addMapping("/**" ) .allowedOriginPatterns("*" ) .allowCredentials(true ) .allowedMethods("GET" , "POST" , "DELETE" , "PUT" ) .allowedHeaders("*" ) .maxAge(3600 ); } }
认证处理器 实际上在UsernamePasswordAuthenticationFilter进行登录认证的时候,如果登录成功了是会调用AuthenticationSuccessHandler的方法进行认证成功后的处理,失败则是调用AuthenticationFailureHandler,实现这两个接口即可
补充一下还有一个登出成功处理器,实现接口是LogoutSuccessHandler
然后在SecurityConfig中配置
1
2
3
4
5
6
7
8
http.formLogin() .successHandler(successHandler) .failureHandler(failureHandler); http.logout() .logoutSuccessHandler(logoutSuccessHandler);